

Post by AlanB on Apr 10, 2006 6:43:08 GMT -5
How do I weave that fly?
Well with a fair amount of practise.

Practise is the key. You need to practise the weave and just the weave to begin with. In order to do this you need to tie up six flies at a time to this stage. If you are not prepared to tie six hooks up to this stage before going on give up now. Sorry, I can not teach you to weave.
Still with me? Good, go and put the kettle on and make a cuppa. Read through these instructions then go to the toilet! You don’t want any interruptions while you do this. Yank the phone cable from the wall like in the movies (you need to get rid of any aggression) and drop your mobile into the toilet bowl (if you have a waterproof one take the battery cover off first)
First an apology. I live alone (no I’m not apologising for that), and do not have three hands. I am not going to be able to photograph this all the way through. You will have to make do with some drawings of the stages I can not photograph.
The materials you can use are fairly limitless. Any yarn will do. Embroidery yarn is a good idea as it is not too heavy, and not too expensive. Antron Body Wool or something similar) is another good idea, also floss (usually on smaller flies) and even tying thread if you ever try weaving on a size #32! However by far the easiest material to weave with, for the beginner, is “nymph glass” or one of the equivalents. Either solid type or the fine tubing ones.
You will need two distinct colours of whatever material you decide to use. The two strands will need to be very close in diameter to each other. Probably best to use two colours both of the same material to begin with. When you have some experience you will be able to weave with materials of different sizes. Usually the lighter colour will go on the bottom of the fly. (Of course you can tie these flies to fish upside down in which case the bottom of the fly becomes the top of the hook shank. Buts lets leave that sort of thing until we can tie the basic bug shall we?)
The first stage is to weight the hook. This is probably best done with lead wire. You then need to smooth out the lumps and bumps, especially the ones at the ends of the lead. Build ramps of thread up to both ends of the lead (There is no need to fully encapsulate the lead). One way to do this quickly is to use floss in your bobbin holder, rather than thread.
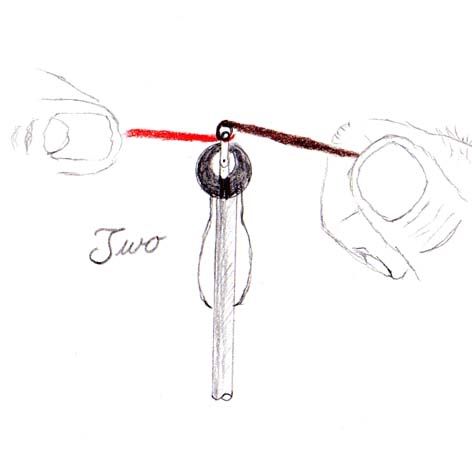
Tie in the two weaving media. From here on I think we will call them “light yarn” and “dark yarn”. Take about 8” (20cm) of each yarn. These are tied in side by side to the top of the hook, with light yarn on the far side, away from you. Make three or four “holding pressure” wraps over both yarns and draw them throw to the bend of the hook to trap down the ends. Make several securing wraps working toward the eye. (The yarns must be tied down all the way to the bend of the hook with none of the under body sticking out the bend end.) Whip finish, and trim out the floss.
This next stage is very important! Prepare a bobbin holder with the thread you want to make the head out of. It should be ready to start on the hook and placed close to hand. Before you have woven the six flies you have ready you will forget this and then learn just how important it is to have it ready now!
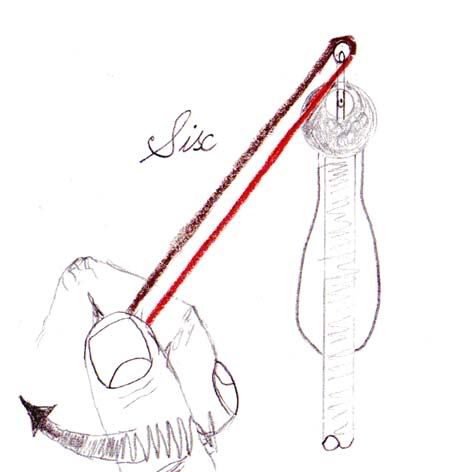
Right here we go. If I was teaching a class this is where the entertainment would start. Not your entertainment, mine. Turn the vice so the jaws are facing you, you must be eye to eye with the hook. If you are tying right handed the light yarn will now be to the right of the hook, and the dark yarn to the left. With your left hand reach under the hook and take hold of the light yarn in finger and thumb. This doesn’t have to be a death grip, relax (though it will take you a few flies to ease off the tension). Pull the light yarn under the hook shank and in front of the dark yarn. Throughout the weave the light yarn will always be in front of the dark yarn.

With your right hand take hold of the dark yarn in the same grip as the light yarn, and bring it under the light yarn and over the hook shank. You have just made the first “join” in the weave. By adjusting the balance of the tensions between your hands you can place this join where you want it around the hook shank. The usual place for the join is so that the light yarn is flat under the hook shank and the dark yarn covers the top.
This is where I disagree with Mr Edwards. I change hands, but you don’t have to.
Let’s recap, you have the hook facing you and the light yarn coming from the joint and held in your left hand. The dark yarn is pulled over the hook and is held in your left hand.
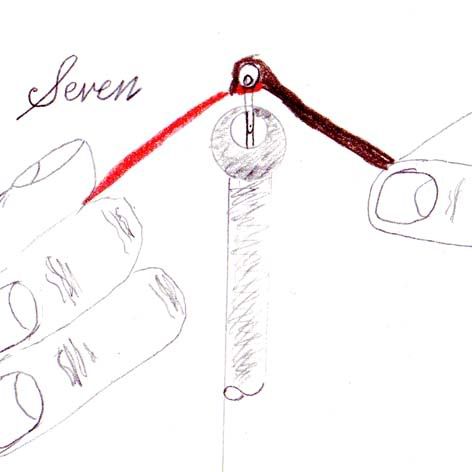
Now pass the light yarn under the hook shank and take hold of it in your right hand. If you are doing this right you should be able to see your right thumb’s nail. Turn your hand so that the thumb nail is away from you. The direction of the turn is to turn the thumb’s nail away from the hook not toward it.
This turn with both yarns in the grip starts to create the second join. To complete the second join take the dark yarn in your left hand and bring it over the hook shank. Position the join by adjusting the tensions between your hands. It is not about holding tight it is about the balance of tensions.
Now bring the light yarn back under the hook shank placing the light yarn into the left hand (which already has the dark yarn in the finger and thumb grip). Turn the hand again so that your thumb nail is moving away from the hook. Take the dark yarn in your right hand and take it across the top of the hook shank. Adjust the join into position. Go back to and start again to make the next two joints.
Continue along the hook shank making as many joints as you can get on either side of the hook.
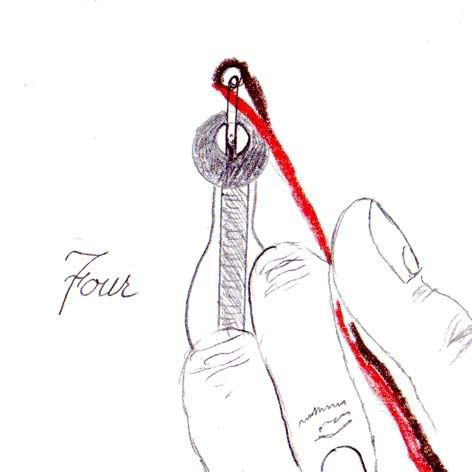
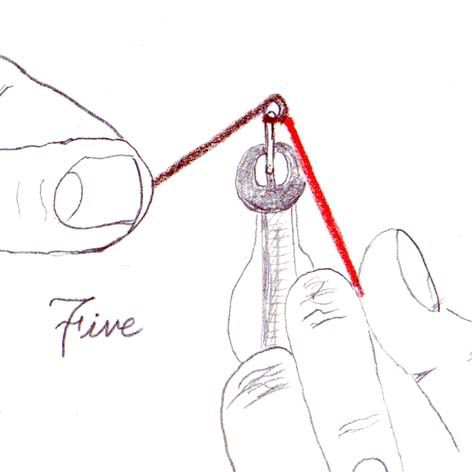
When you get close to the eye hold both yarns in your left hand. Pinch the yarns with your right index finger and thumb to the top of the hook shank. Using your left hand turn the vice back to its normal position. Don’t let go with your right hand!
Re grip the two yarns in your left hand and with your right hand pick up the bobbin holder you prepared earlier. Using the tube of the bobbin holder work the thread into the grip you have on the two yarns. Then start the thread behind the eye. Now tie down the two yarns and trim out the two yarns close to the tie down point. Whip finish and put that one aside. Immediately get another prepared hook and weave that. Do all six one after another. If you want to add hackles or legs etc do so once you have done six flies.
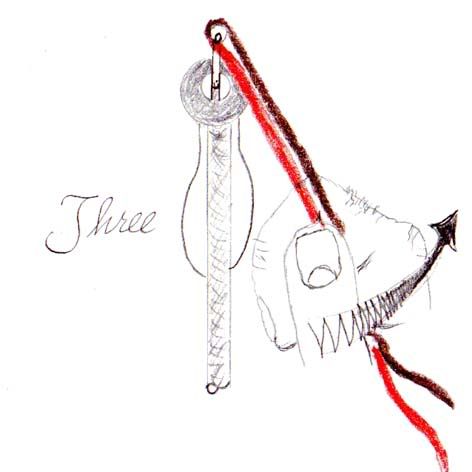
The fly that you asked about is tied on a pre weighted hook from Partridge. The tail and legs are Coq de Leon. There is no substitute. You can use hackle fibres of any colour but the markings and texture of CdL (Pardo in this case) are unique. The two yarns are Uni Floss. And the thorax cover is feather fibre from any large feather. The only slightly difficult part of tying it is weaving around the thorax cover. Fold it forward over the eye while you weave from the bend to the thorax then fold it back when you have woven up to the point it is tied in. Finish the weave in the usual way and bring the thorax cover over the top and tie in. Tie in a bunch of CdL fibres to either side and there you have it.
Well with a fair amount of practise.
Practise is the key. You need to practise the weave and just the weave to begin with. In order to do this you need to tie up six flies at a time to this stage. If you are not prepared to tie six hooks up to this stage before going on give up now. Sorry, I can not teach you to weave.
Still with me? Good, go and put the kettle on and make a cuppa. Read through these instructions then go to the toilet! You don’t want any interruptions while you do this. Yank the phone cable from the wall like in the movies (you need to get rid of any aggression) and drop your mobile into the toilet bowl (if you have a waterproof one take the battery cover off first)
First an apology. I live alone (no I’m not apologising for that), and do not have three hands. I am not going to be able to photograph this all the way through. You will have to make do with some drawings of the stages I can not photograph.
The materials you can use are fairly limitless. Any yarn will do. Embroidery yarn is a good idea as it is not too heavy, and not too expensive. Antron Body Wool or something similar) is another good idea, also floss (usually on smaller flies) and even tying thread if you ever try weaving on a size #32! However by far the easiest material to weave with, for the beginner, is “nymph glass” or one of the equivalents. Either solid type or the fine tubing ones.
You will need two distinct colours of whatever material you decide to use. The two strands will need to be very close in diameter to each other. Probably best to use two colours both of the same material to begin with. When you have some experience you will be able to weave with materials of different sizes. Usually the lighter colour will go on the bottom of the fly. (Of course you can tie these flies to fish upside down in which case the bottom of the fly becomes the top of the hook shank. Buts lets leave that sort of thing until we can tie the basic bug shall we?)
The first stage is to weight the hook. This is probably best done with lead wire. You then need to smooth out the lumps and bumps, especially the ones at the ends of the lead. Build ramps of thread up to both ends of the lead (There is no need to fully encapsulate the lead). One way to do this quickly is to use floss in your bobbin holder, rather than thread.
Tie in the two weaving media. From here on I think we will call them “light yarn” and “dark yarn”. Take about 8” (20cm) of each yarn. These are tied in side by side to the top of the hook, with light yarn on the far side, away from you. Make three or four “holding pressure” wraps over both yarns and draw them throw to the bend of the hook to trap down the ends. Make several securing wraps working toward the eye. (The yarns must be tied down all the way to the bend of the hook with none of the under body sticking out the bend end.) Whip finish, and trim out the floss.
This next stage is very important! Prepare a bobbin holder with the thread you want to make the head out of. It should be ready to start on the hook and placed close to hand. Before you have woven the six flies you have ready you will forget this and then learn just how important it is to have it ready now!
Right here we go. If I was teaching a class this is where the entertainment would start. Not your entertainment, mine. Turn the vice so the jaws are facing you, you must be eye to eye with the hook. If you are tying right handed the light yarn will now be to the right of the hook, and the dark yarn to the left. With your left hand reach under the hook and take hold of the light yarn in finger and thumb. This doesn’t have to be a death grip, relax (though it will take you a few flies to ease off the tension). Pull the light yarn under the hook shank and in front of the dark yarn. Throughout the weave the light yarn will always be in front of the dark yarn.
With your right hand take hold of the dark yarn in the same grip as the light yarn, and bring it under the light yarn and over the hook shank. You have just made the first “join” in the weave. By adjusting the balance of the tensions between your hands you can place this join where you want it around the hook shank. The usual place for the join is so that the light yarn is flat under the hook shank and the dark yarn covers the top.
This is where I disagree with Mr Edwards. I change hands, but you don’t have to.
Let’s recap, you have the hook facing you and the light yarn coming from the joint and held in your left hand. The dark yarn is pulled over the hook and is held in your left hand.
Now pass the light yarn under the hook shank and take hold of it in your right hand. If you are doing this right you should be able to see your right thumb’s nail. Turn your hand so that the thumb nail is away from you. The direction of the turn is to turn the thumb’s nail away from the hook not toward it.
This turn with both yarns in the grip starts to create the second join. To complete the second join take the dark yarn in your left hand and bring it over the hook shank. Position the join by adjusting the tensions between your hands. It is not about holding tight it is about the balance of tensions.
Now bring the light yarn back under the hook shank placing the light yarn into the left hand (which already has the dark yarn in the finger and thumb grip). Turn the hand again so that your thumb nail is moving away from the hook. Take the dark yarn in your right hand and take it across the top of the hook shank. Adjust the join into position. Go back to and start again to make the next two joints.
Continue along the hook shank making as many joints as you can get on either side of the hook.
When you get close to the eye hold both yarns in your left hand. Pinch the yarns with your right index finger and thumb to the top of the hook shank. Using your left hand turn the vice back to its normal position. Don’t let go with your right hand!
Re grip the two yarns in your left hand and with your right hand pick up the bobbin holder you prepared earlier. Using the tube of the bobbin holder work the thread into the grip you have on the two yarns. Then start the thread behind the eye. Now tie down the two yarns and trim out the two yarns close to the tie down point. Whip finish and put that one aside. Immediately get another prepared hook and weave that. Do all six one after another. If you want to add hackles or legs etc do so once you have done six flies.
The fly that you asked about is tied on a pre weighted hook from Partridge. The tail and legs are Coq de Leon. There is no substitute. You can use hackle fibres of any colour but the markings and texture of CdL (Pardo in this case) are unique. The two yarns are Uni Floss. And the thorax cover is feather fibre from any large feather. The only slightly difficult part of tying it is weaving around the thorax cover. Fold it forward over the eye while you weave from the bend to the thorax then fold it back when you have woven up to the point it is tied in. Finish the weave in the usual way and bring the thorax cover over the top and tie in. Tie in a bunch of CdL fibres to either side and there you have it.
Cheers,
Alan.